Part 1 of the “Building with Sitecore Content SDK 2 and Next.js” series
Sitecore Content SDK 2 modernizes frontend development for SitecoreAI with Next.js 16, React Server Components, App Router, and a modular architecture for analytics, events, personalization, and other platform capabilities.
In this post, we will:
- Clone the official Content SDK 2 starter.
- Connect it to a SitecoreAI environment.
- Run the site locally.
- Understand its App Router architecture.
- Review server and client component maps.
- Validate Preview mode and Sitecore Pages.
- Create and test a production build.
Technology versions
Sitecore recommends using a current Node.js LTS version, an IDE such as Visual Studio Code, and access to a SitecoreAI environment containing at least one site. Content SDK 2 also moves the Next.js integration to Next.js 16 and Node.js 24.
The implementation was validated with:
| Technology | Version |
|---|---|
| Node.js | 24.18.0 |
| npm | 11.16.0 |
| Sitecore Content SDK | 2.2.0 |
| Content SDK CLI | 2.2.0 |
| Next.js | 16.2.9 |
| React | 19.2.7 |
| TypeScript | 5.8.x |
1. Clone the official starter
Sitecore provides the xmcloud-starter-js repository, which contains basic starter applications and more complete examples.
For this tutorial, we will use kit-nextjs-skate-park because it already contains components, navigation, styling, App Router support, and Sitecore Pages integration.
Clone the repository:
git clone https://github.com/Sitecore/xmcloud-starter-js.gitThe repository includes multiple starters:
xmcloud-starter-js
├── examples
│   ├── basic-nextjs
│   ├── basic-nextjs-pages-router
│   └── kit-nextjs-skate-park
└── xmcloud.build.json
Open the cloned folder in Visual Studio Code
2. Install the dependencies
Because the project includes a package-lock.json file, use npm ci to install the exact dependency versions defined by the lock file.
Open a Terminal in Visual Studio Code and execute:
cd xmcloud-starter-js\examples\kit-nextjs-skate-park
npm ci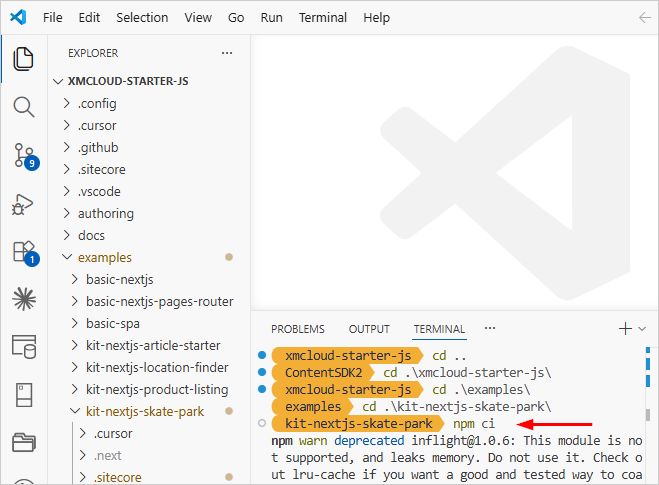
Using npm ci ensures that developers and CI pipelines install the exact dependency versions recorded in package-lock.json.
3. Create a project and site in SitecoreAI
To keep this tutorial isolated from other environments, we first created a new project in SitecoreAI:
- Project: GB-ContentSDK2
- Environment: dev-env
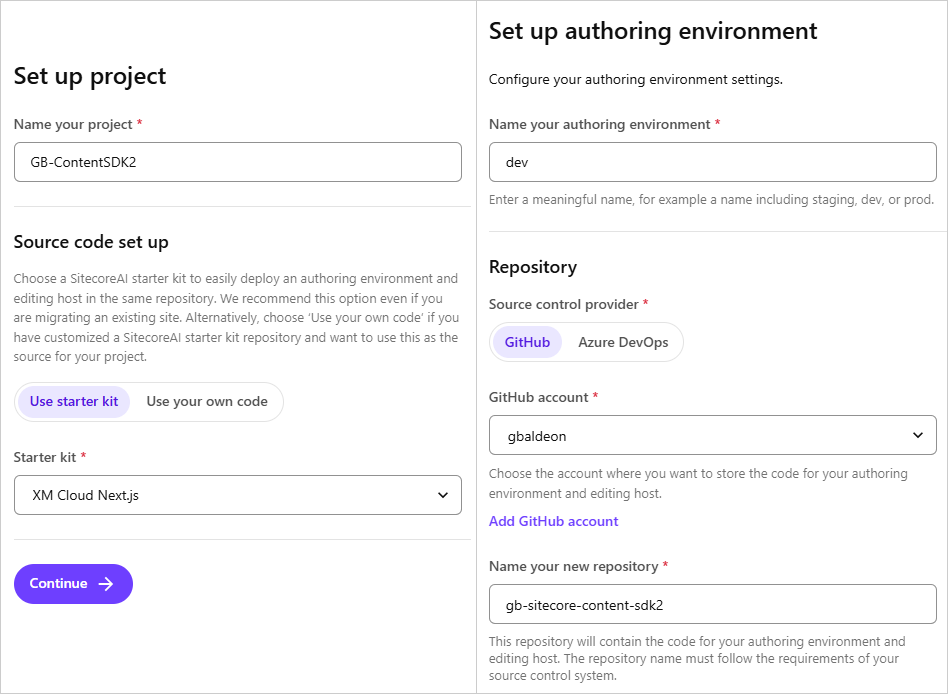
After the project and its environment were ready, we opened Channels and created a site using the Basic site template.
- Site name: Content SDK 2 Demo
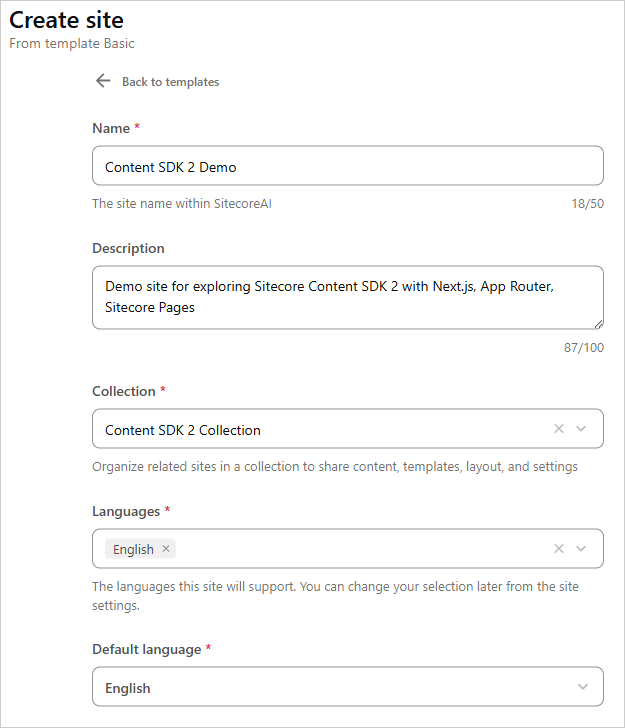
The Basic site template provides an initial page, navigation, layouts, and sample components. This gives us enough content to validate the frontend connection before creating custom components.
4. Get the SitecoreAI environment variables
Open the Developer settings for the dev environment in the SitecoreAI Deploy app:
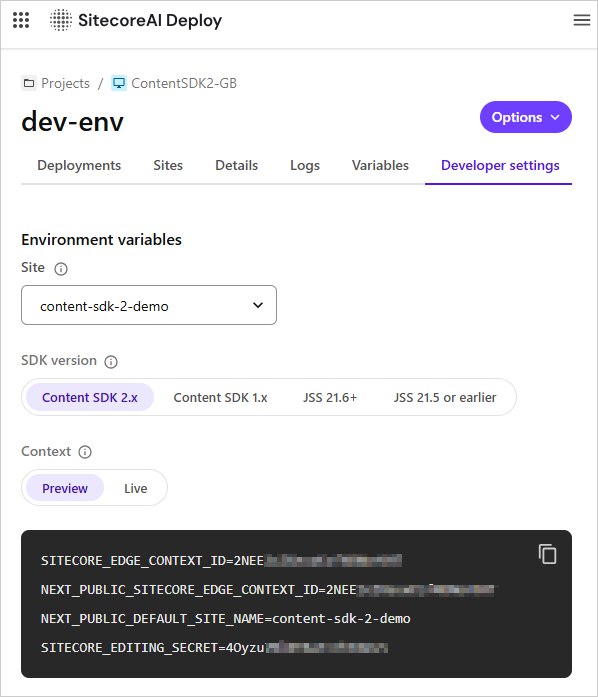
Preview context is appropriate for local development because it allows the application to retrieve both published and unpublished content. A Live context should be used when the application must display published content only.
Use Copy to clipboard button to copy the generated variables.
5. Create .env.local
The starter includes .env.remote.example, which documents the variables required to connect the application to a remote SitecoreAI environment.
Create .env.local using the variables copied from Developer settings:
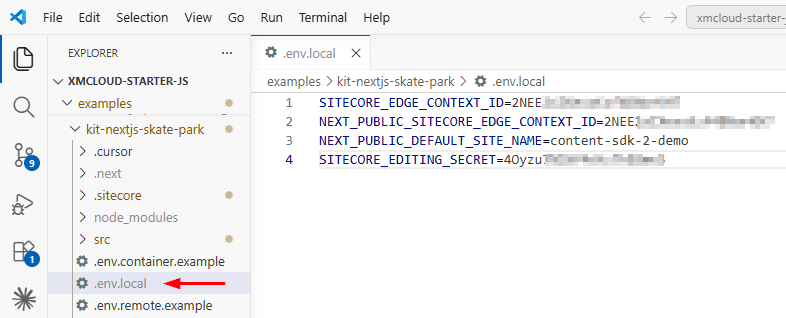
The starter also contains a minimal sitecore.config.ts:
import { defineConfig } from '@sitecore-content-sdk/nextjs/config';

export default defineConfig({});
This file is the central configuration point for a Content SDK application. The starter keeps it lightweight and obtains most values from environment variables and SDK defaults. It can later be extended when custom Edge, multisite, redirect, personalization, or retry behavior is required.
6. Run the site locally
Start the development server:
npm run devThis command:
- Generates the component maps
- Builds the Sitecore configuration
- Starts Next.js
- Watches component changes
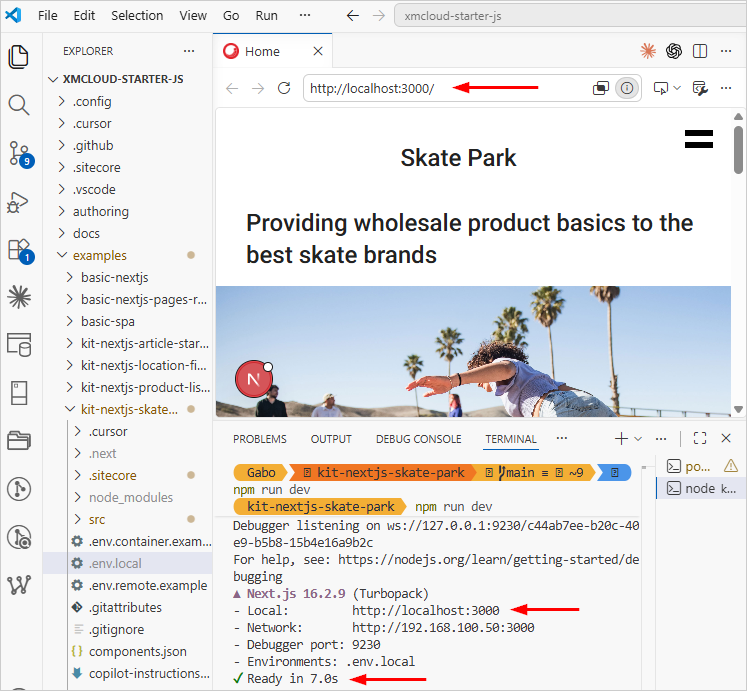
When initialization completes, Next.js displays:
Local: http://localhost:3000
Environments: .env.local
Ready
Open:
http://localhost:3000/enIf the home page loads, the application is successfully retrieving layout and content from SitecoreAI.
7. Understand the App Router structure
The main content route is:
src/app/[site]/[locale]/[[...path]]/page.tsxThe dynamic segments represent:
[site]       → Sitecore site system name
[locale]     → requested language
[[...path]]  → optional Sitecore content path
The relevant application structure is:
src/app
├── api
│   ├── editing
│   ├── ai
│   ├── robots
│   └── sitemap
├── [site]
│   ├── layout.tsx
│   └── [locale]
│       └── [[...path]]
│           ├── page.tsx
│           └── not-found.tsx
├── layout.tsx
└── not-found.tsx
Content SDK’s App Router integration provides support for nested layouts, Server Components, Client Components, Sitecore Pages, and dynamic site and language resolution.
8. How the proxy resolves requests
The src/proxy.ts file composes multiple Content SDK proxies, each proxy has a specific responsibility:
| Proxy | Responsibility |
| PreviewProxy | Processes Sitecore Pages and Preview requests |
| LocaleProxy | Resolves the request language |
| AppRouterMultisiteProxy | Resolves the Sitecore site and internal route |
| RedirectsProxy | Applies redirects configured in Sitecore |
| PersonalizeProxy | Prepares the request for personalization |
For example, a public URL such as:
/en/about
can be internally resolved to:
/content-sdk-2-demo/en/about
The site segment is used by App Router but does not need to be exposed in the public URL.
API routes, Next.js assets, media, health checks, sitemaps, and other technical paths are excluded from the proxy chain to avoid unnecessary processing.
9. Render Sitecore placeholders
After resolving the route, the Sitecore client retrieves the corresponding page layout.
The starter’s Layout.tsx renders three main placeholders:
- headless-header
- headless-main
- headless-footer
The rendering flow is:
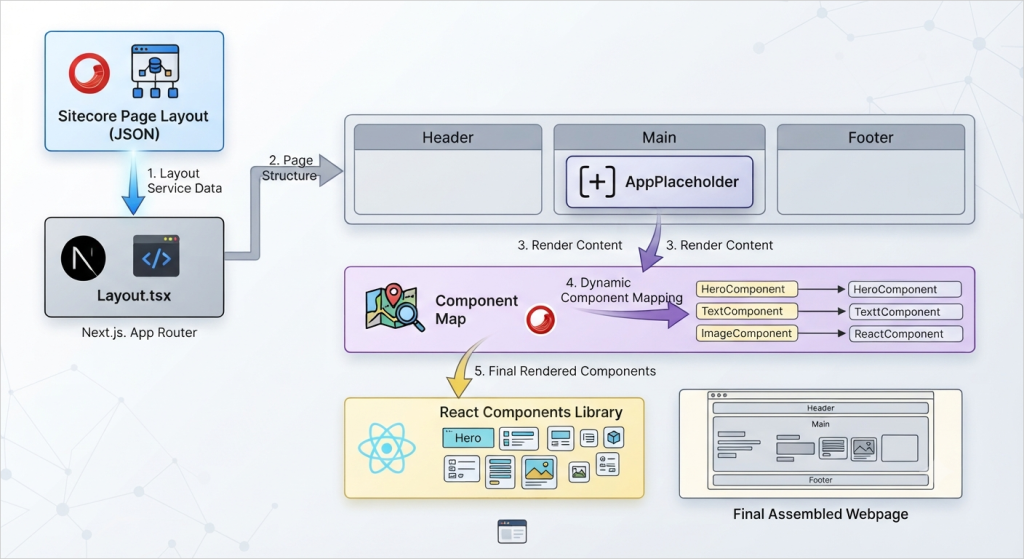
AppPlaceholder provides a single rendering API for both Server and Client Components. It receives the resolved Sitecore page and the generated component map, then passes the required context to each rendered component.
10. Server and client component maps
The Content SDK CLI automatically generates:
.sitecore/component-map.ts
.sitecore/component-map.client.ts
The server map contains all available components, including:
- Title
- RichText
- Promo
- Image
- Navigation
- ContentBlock
- Container
- ColumnSplitter
The client map contains only components that require browser-side execution:
- Navigation
- ContentBlock
- Form
- BYOCWrapper
- FEaaSWrapper
This separation prevents server-only component code from being included in the browser bundle. It also allows most presentation components to remain Server Components while interactive components receive client-side JavaScript.
The files inside .sitecore are generated automatically and should not be modified manually.
11. Validate Sitecore Pages and Preview
Open the site in Sitecore Pages. The page should load inside the editing canvas and allow its components and fields to be selected.
To validate Preview mode:
- Edit a title or text field in Sitecore Pages.
- Save the change.
- Do not publish it.
- Refresh http://localhost:3000
Because the local application uses Preview context, the unpublished change appears immediately.
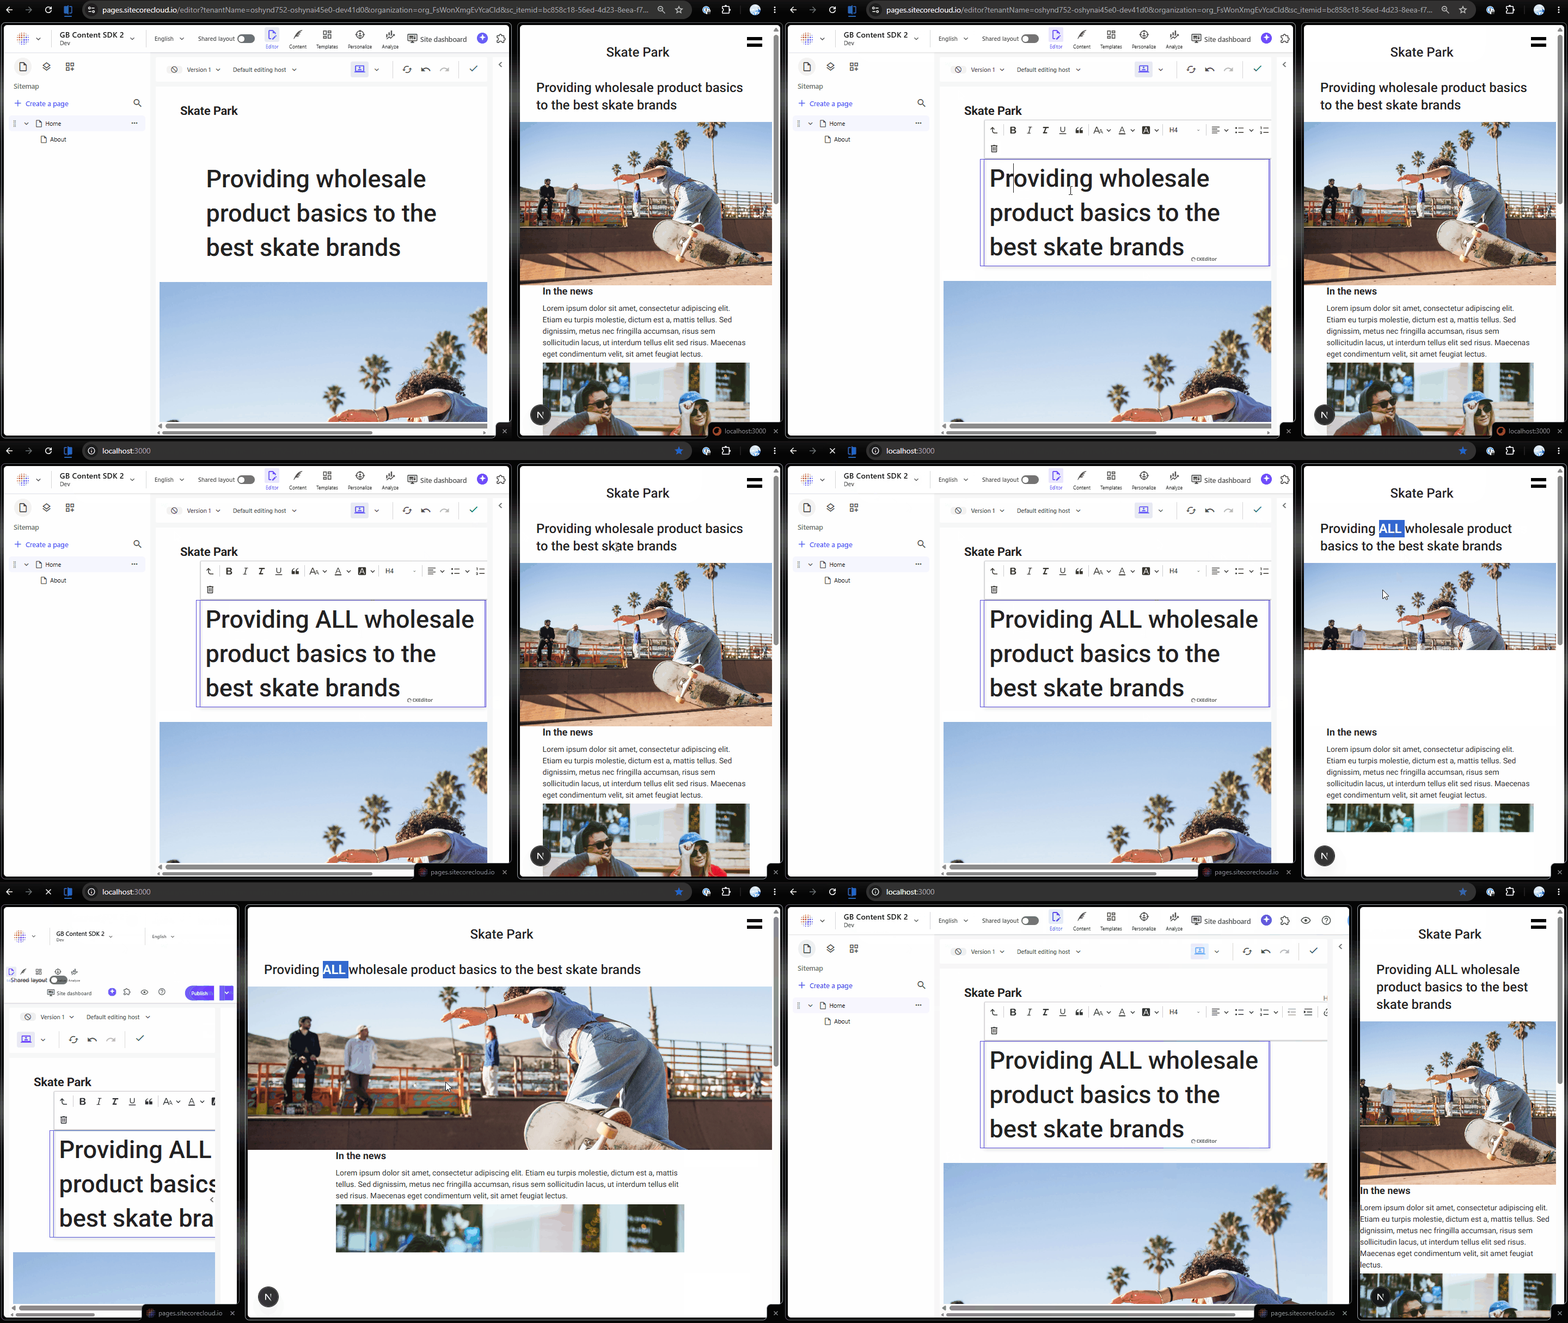
This confirms that the local frontend supports the authoring workflow and is not limited to published Experience Edge content.
12. Validate the application
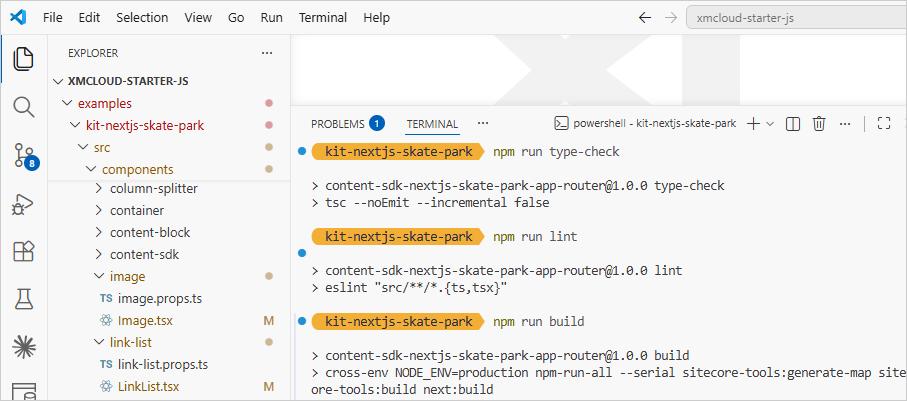
Run the following checks before considering the application ready:
TypeScript
npm run type-checkThis validates TypeScript without generating JavaScript files.
ESLint
npm run lintProduction build
Create the production build:
npm run buildThe script regenerates the component maps, builds the Sitecore artifacts, and runs next build
13. Development versus production mode
During development, use:
npm run devThis enables:
- Hot reload.
- Detailed development errors.
- Component map watchers.
- Automatic regeneration when components change.
To serve an existing production build, use:
npm run next:startA build must exist first:
npm run build
npm run next:start
The project also defines:
npm startIn this starter, npm start creates the production build and then starts Next.js.
Changes made after npm run build will not appear in next:start until the build is generated again.
Conclusion
In this first part, we connected Sitecore Content SDK 2.2 to a dedicated SitecoreAI site and validated the complete rendering flow.
We also confirmed:
- Local rendering with Next.js 16.
- Dynamic site and language resolution.
- Visual editing through Sitecore Pages.
- Unpublished content through Preview context.
- Separate server and client component maps.
- TypeScript and ESLint validation.
- A successful production build.
Content SDK 2 does more than replace the previous SDK integration. App Router, React Server Components, and generated component maps establish a clearer separation between server rendering and browser interactivity.
In the next part, we will create an editable component using the Content SDK CLI, add it to Sitecore Pages, and compare its implementation as a Server Component and a Client Component.